Getting Started
This is a quick guide to get you started with userBase (uB) user management and stats system.
setting up userBase
Step One: Creating the database
First we need to create a database. Open up PHPMyAdmin or some other MySQL administrator panel that you use.
First thing we need to do is to create a database. Lets call it "ubase_db"
(note: if you already have a database for your website then you can skip that step – but if you are importing userBase tables into an exsisting database then remember to make a backup first.)
Step Two: Installing the system
UserBase is the first of my apps to sport an installer. So navigate to the installer/ folder in the main folder of the downloaded package - it should be in "ubase/installer/" - and follow the on screen instructions.
Please note that you'll need to get re-captcha API keys from this website
Step Three: Setting up the geo-stats
To make full use of the geo-stats and reporting aspect of this application you will need to download and 'install' an ip-to-country database. There are a number of these avaliable online for free and a number of them that are not so free with different licencing agreements.
There is this ip-to-country database from webhosting.info. This is a little out of date but easiest to upload into the database as it does not include any extra data.
I recommend this ip-to-country database from software77.net. It's updated daily. It is recommened to keep your database fresh and update it once a month and that is why I do not pre-load our apps with it for you. With this database you will have to remove two columns of extra data before uploading.
Once you have your CSV file you will need to make sure it is formatted in with the correct fields:
Column 1: must contain the IP range start value
Column 2: must contain the IP range end value
Column 3: must contain the two letter country code
Column 4: must contain the three letter country code
Column 5: must contain the ISO full country name
Once in the correct format import the data to the stats_country_ip table in your database.
Finally you must run the following query on your database:
                        UPDATE stats_country_ip
                            SET ipstart = TRIM(ipstart),
                                ipend = TRIM(ipend),
                                2letter = TRIM(2letter),
                                3letter= TRIM(3letter),
                                full=TRIM(full);
That will clear up any extra whitespace in the fields and that should be it.
Step Four: Configuration settings
Head over to the configuration file (userbase/config/config_global.php) and set up any extra settings - in particular the URLs and file paths. See : the configuration file
the live demo!
If you're anything like me then you want to quickly see this in action so I've created a live demo for you to have a quick look at and to use
as a live coding example to refer to.
The administator panel is located in the "ubase/admin/" folder
And the user area is located in the "ubase/index_js_and_noscript/" folder - this includes all the css/js and image files you need for the front end. It also includes
scripted and noScipt code version of all the front end functionality (that being register/login/activate/forgot password/change email/password and the social media
logins). Go to "ubase/index_js_only/" if you want a version of the same features but only for script enabled users.
How To: Protecting your pages
code samples & breakdowns
Okay, okay. Enough with the live demo. Let us dive into the actual code to understand all the features avaliable.
If you have any issues use the live demo in the "index" folder as a working example.
This is the code of how to protect your php pages - I'll break down the code in a bit:
At the top of your page in the PHP tags put this:
                    //basic include files
                    require_once("../config/config_global.php");
                    require_once("../includes/bootstrap_frontend.php");

                    //protecting the page
                    sessionsClass::site_protection(true,true,true,false, true);
That's pretty much it:
Okay let me break this function down:
        //protecting the page
        sessionsClass::site_protection(true,true,true,false,true);
paramters
first: set to true if you want to collect stats data for traffic coming to your site
second: set to true if you want to block access based on site block rules you've set
third: set to true if you want to test if the user has logged in - ie the actual page protection
fourth: This is for testing user groups
fifth: Set this to true if you want the system to check against browser cookies. If a cookie is found the session and log-in is based on that.
usergroups
Let's have a look at how to test for user groups:
sessionsClass::site_protection(true,true,true,$groupTest=array(1,2,3));
With the code above we are testing to make sure the user who has logged in is in one of these user groups (1,2,3). These are the ID values of the user groups in the database.
If we just want to do a general check to make sure the user is logged in we set the fourth parameter to "false".
        //protecting the page
        sessionsClass::site_protection(true,true,true,false);
How To: Collecting Stats with siteStats
code samples & breakdowns
A little more detail about what you need to collect visitor & user stats.
sessionsClass::site_protection(true,true,true,false);
Make sure the first parameter in the above function call (as explained above) is set to true. This should be done one every external facing page (a page visitors/users can access) of your site.
Then in the head tag put the following code:
                    <script type="text/javascript" src="js/ubf_js.js"></script>


                    <script type="text/javascript" src="js/jquery-1.4.2.min.js"></script>


                    <script>

                        $(document).ready(function () {
                            set_ub_stats();
                        });

                    </script>
Again this needs to be done on every external facing page. Please note ubf_js.js is required for all other scripted features such as register, login, forgot password etc in the user front end.
How To: Accessing User Data - avaliable in v1.1.1+
code samples & breakdowns
A little request by users: a quick and easy method to access user data in a simple call. Okay, I went a bit out on the town on this to make sure it was flexiable and simple at the same time. First let's look at the call itself.
                    $data = Admin::get_user($userid,false,'basic',false);
                    if ($data !== false){
                        //process data here
                    }
                    else{
                        //error message here
                    }
Let's break down the parameters:
First parameter: the user ID value of the user you require. If it's the one logged in then use $_SESSION['userid'] to get
this user ID value.
Second parameter: Set to true if you want to put the retrived data in to the $_SESSION array - it will use the field names in
the database for the session value names.
Third parameter: This is the name of the call type - I'll explain a bit more about this below.
Forth parameter: Set this to true if you want to use field alias names. Say for example you did not
want to access the end result by the field names in the database but by your own names. See below about how to set this up.
Third Parameter: Call Type
To make this really flexiable and easy to use (ie avoid too much coding). I've set this up so you can set "call types" on common data request requirements. To see how this works open up userbase/config/config_global.php and find the code below.
                    $user_request = array (
                            'basic'=>array(

                                    'username'=>'User Name',
                                    'userid'=>'User ID',
                                    'email'=>'Email Address',
                                    'date_joined'=>'Registration Date',
                                    'last_visit'=>'Last Login'
                            ),

                            'advanced'=>array(

                                    'username'=>'User Name',
                                    'userid'=>'User ID',
                                    'email'=>'Email Address',
                                    'date_joined'=>'Registration Date',
                                    'last_visit'=>'Last Login',
                                    'ipad'=>'Registration IP Address',
                                    'lastip'=>'Last Login IP Address'
                            ),

                            'all'=>array(

                                    '*'=>''
                            )


                       );
Okay, here you have each "call type" with the data it will be requesting. The key=>value pairs work out to be: the field name in the database => the alias you want use to access these pieces of data. So if you set the forth parameter in the call to true, then the system will set the keys of your returning data array with the alias values.
In the examples above I've set the alias values up so I have presentable labels to print on to screen. You can name them as you need. You may add as many "call types" as you like.
How To: Move the index folders from the root - for v1.2+
New for version 1.2. With better include file management now you can move your index or admin folders outside the main userbase root folder. The only thing you have to make sure is that the main setting in "local_config.php" in your index or admin folder is always pointing back to "userbase/config/config_global.php". That's it. The system will do the rest for you.
How To: The Integrated Contact Us Form - for v1.2+
New for version 1.2. The integrated "contact us" form not only protects your email address from spam, validates inputs but it also aids client/customer support productivity.
1. If a user is logged in when they use the contact form the email will be headed with the user details taken from the userbase database. This includes the username, email on record and a link that takes you directly to the user record in the admin area of userbase.
2. If the user is not logged in but is contacting you with an email address on record then this users details are also sent with the message (as above) to aid support staff productivity.
3. If the user and email are unknown then the system will send a plain message.
How To: Same Login for All Sub Domains - for v1.2+
New for version 1.2. Now you can have one login for all sub domains of your site. Simply go to "userbase/includes/lightwork_sessions.php" and find the function called 'sessionStart()' - here uncomment lines 42 and 43 and replace the domain with your own.
Note: make sure the domain on line 43 starts with a dot (ie: .nadlabs.co.uk)
How To: Turning Off Captcha During Registration - for v1.1.2+
code samples & breakdowns
Another little request by users: Having the ability to use the system without a captcha. This could not be simpler.
1. Go over to the configuration file in userbase/config/config_global.php and find the "USE_CAPTCHA" setting.
2. Set this setting to false.
Now that is it. If you've left the PHP coding inside your registration forms (both script and noScript versions) userBase will automatically hide the captcha fields (note - hide, not remove. They must still be present in the HTML of the page).
Minifying the js & css files
Once you have finished developing and are ready for going live you should minify ALL the css/js files both in the admin and index folders. This will greatly speed up page loads. I was going to include pre-minifed files as well as unminified files but with the risk of me shipping inconsistant copies I thought I'd just ship with unminified copies and leave you, the developer, to tinker and minifiy at you lesiure.
I use YUICompressor for minifying. Works a charm and can reduce file sizes a fair bit.
Download YUI compressor & learn more about it
If you have access to activating Apache Mods then activate GZip or Deflate
SMALLER AND FASTER WEB PAGES WITH GZIP, DEFLATE AND APACHE
Setting up the Preimum Groups (new for v1.3)
To set up the premium groups you must login to the admin area and head over to "Security & Groups". Once here click on "Manage Groups".
Now click "add new group" and you'll see options to:
- Select if the group is regular or premium
- Choose the membership fee ("Premium Charge")
- And the number of days after which the membership must be renewed
Setting up the regitsration form for premium groups
To see how to set up the registration form and the difference between the regular signup and the premium signup please head over to the index.php file in the main index folder
The main difference is this field here. If you're setting up a regular signup this must always be set to "value='1'" whereas a premium group signup MUST have the user groups ID value. You can find this in the admin area next to the group name in brackets
                       //premium groups - value must be the user group ID value


                       //regular groups
Extra configuration settings for paypal payments
There are three new settings inside the configuration file related to paypal payments.
                            //The email address to which all payment logs will be sent as a back up
                            define ('PP_LOGS_EMAIL','pplogs@example.com');

                            //Your main business email you use for paypal.com
                            define ('PP_MAIN_EMAIL','pplogs@example.com');

                            //Your site URL
                            define ('PP_SITE_URL','http://www.example.com');

                            //Your Site Logo - PayPal will look in http://www.example.com/ourlogo.gif with this example settings
                            define ('PP_SITE_LOGO','ourlogo.gif'); //will look in PP_SITE_URL followed by PP_SITE_LOGO

                            //The location of the IPN file - this should be a subdomain if possible that is unknown to the public
                            define ('PP_IPN_URL','http://ipn.example.com/ipn.php'); //should direct this to userbase/inp

                            //Your chosen paypal currency
                            define ('PP_CUR','GBP');

                            //For developers - change this to 'true' if you want test out using the developer sandbox version of paypal
                            define ('PP_SANDBOX',false);
Access user payment data
To access the users payment data via the admin control panel, select a user and then click on "payments" button in the user details panel. This will show you a list of all PayPal payment transactions - including details of when the payment was started and completed with two seperate records. Selecting "Membership details" in this area will show and allow you to edit the following details:
- The account/membership renewal date
- The current membership fee the user is paying
It will also allow you to turn off the paid/premium element of the users account without deleting their membership data. You can also access full data and transaction logs via the database itself.
Protecting premium content
If you head over to userarea.php in the main index folder you'll see an example of how premium content can be protected. A whole page or just a part of the page can be protected as required.
The main bit of code required is as follows:
                            /*

                                after checking if the user has logged in, get the user id and pull up
                                the users profile data using the "get_user" function. This is described
                                in the chapters above.

                            */
                            $userid = dbase::globalMagic($_SESSION['userid']);
                            $data = Admin::get_user($userid,false,'profile',true);


                            $premium_access = false;
                            if ($data !== false){


                                // check if the users account is a paid account AND does not require renewing

                                if($data['paid']==1 && $data['needrenew']==0){
                                    //okay show premium content as user has paid and membership is not up for renewal
                                    $premium_access = true;
                                }
                            }


                            //then in the HTML use $premium_access to decide whether to show the content or not
                        Premimum Content


                            This can also be used to protect whole pages


                        Normal Content


                            Your need paid access to get premium content
the configuration file
This is the configuration file settings for userBase - siteStats settings at the end.
| variable | values | default value | comments |
| APP_ID | API ID | blank | Your public key from the Facebook developer app - you need a verfied facebook account for this |
| APP_SECRET | API key | blank | Your private key from the Facebook developer app - you need a verfied facebook account for this |
| YOUR_CONSUMER_KEY | public Key | blank | Your public consumer key from twitter - you need a twitter account to get this |
| YOUR_CONSUMER_SECRET | private key | blank | Your private consumer key from twitter - you need a twitter account to get this |
| TWITTER_RETURN_URL | URL | see config file | This is the URL that twitter will return your users to once they login. It must end in "index/getTwitterData.php" |
| LOG_FAIL_LOGIN | [true/false] | true | Set to true if you want to log any failed login attempts |
| MAX_LOGIN_FAIL | [numeric value] | 20 | This is the maximum number of login failures in one session before the system quietly stops checking. |
| RECAPKEY RECAPKEY_PUBLIC |
[hash strings] | blank | You will require these to make the re-captcha element work within the registration form. You can get these by registering at recaptcha.net |
| TXTLOCALUSER TXTLOCALPASS |
[username & hash string] | blank | You’ll need these if you’re using txtlocal.com as your SMS service provider. |
| CLICKATELLUSER CLICKATELLPASS CLICKATELLAPIID |
[username, password, API ID] | blank | You’ll need these if you’re using clickatell.com as your SMS service provider. |
| SMS_PROVIDER | [clickatell/txtlocal] | txtlocal | Pick your service provider – currently supports clickatell and txtlocal. |
| SMSTOK | [24hour/1use] | 24hour | SMS security token setting. Set to ‘24hour’ if you want the token to last for a whole, well, 24 hours and ‘1use’ if you want it expire after it’s first use. |
| REGISTER_ONLINE | [true/false] | true | Setting this to false will prevent new user sign ups. Available from v1.1.2 onwards. |
| USE_CAPTCHA | [true/false] | true | Setting this to false will allow your users to avoid using captcha during registration. Available from v1.1.2 onwards. |
| ALLOW_DELETE | [true/false] | true | Set this to false to prevent admins from deleting user accounts. Available from v1.1.2 onwards. |
| DEFAULT_IMG_LOCATION | [URL] | localhost/images/no_img.gif | Image shown in the profile as the users picture/image when no other is present. |
| IMG_SIZE | [numeric] | 73 | The width and height value for the profile image - make sure that it deals correctly with facebook/twitter and regular images. |
| IMG_RATING | [letter] | g | Gravatar image rating |
| MAX_IMG_FILE_SIZE | [numeric] | 1024 | Maximum file upload size in Kb. |
| UPLOAD_PATH | [path] | './uploaded_images' | The location where user profile images will be uploaded. |
| ADMIN_URL | [url] | url | The location of the admin folder - full URL including http etc. |
| AUTO_PAGE_WANTED_REDIRECT | [true/false] | true | Set to true if you want users to be redirected back to the last secure page they requested before being forced to login. |
| ADMIN_ACTIVATED | [true/false] | false | Set this to true if you do not want an activation link sent in the welcome email to new users. All accounts then must be activated by the administrator. Available from v1.1.2 onwards. |
| LOGIN_INACTIVE | [integer value] | 30 | Set session inactivity time out length in mins. Available from v1.1.2 onwards. |
| UNIQUE_SALT | [your unqiue salt value] | unique_salt_val |
Make sure you can remember this in case it gets deleted, somehow, as no one, who has registered up to that point, will be able to login if this value is changed.
If you don’t like the idea of so much hinging on one value, then you can take it out of play by editing “doubleSalt” function in the file ‘main/includes/lightwork_general.php’ – line approx: 384 |
| ADMIN_EMAIL | [valid address] | blank | This is the email address from which the messages from within userbase are sent. |
| REG_EMAIL | [valid address] | blank | This is the email address from which the activation emails are set (on the user registering). |
| SITENAME | [your site name] | testpie | Enter your site name here. This is used in the default email templates (not required if you want to hard code it into your email templates) |
| ACTIURL | [url of your activation page ] | localhost/www/index/activation.php? | This is the base url that is sent in the activation email to new users.
Eg. http://www.yoursite.com/activation.php? Note the trailing question mark – that is required. |
| SITE_DOMAIN | [your site domain] | localhost | This is the site domain - including any subdomain if required. Without the http://www. part of the url. |
| REMEMBER_DURATION | [numeric] | 30 | The number of days the login cookie will remain active. |
| HASH_SETTING | [hash name] | md5 | Name of the hash alogorithm for encrypting the password. Examples include md5, sha1, sha512 etc. |
| PayPal related settings | |||
| PP_LOGS_EMAIL | [email] | pplogs@example.com | The email address to which all payment logs will be sent as a back up |
| PP_MAIN_EMAIL | [email] | pplogs@example.com | Your main business email you use for paypal.com |
| PP_SITE_URL | [url] | http://www.example.com | Your site URL |
| PP_SITE_LOGO | [image file] | ourlogo.gif | The logo used on PayPals site - will look in PP_SITE_URL followed by PP_SITE_LOGO. For example PayPal will look in http://www.example.com/ourlogo.gif with these example settings |
| PP_IPN_URL | [url] | http://ipn.example.com/ipn.php | The location of the IPN file - this should be a subdomain if possible that is unknown to the public. Should direct this to userbase/inp |
| PP_CUR | [currency code] | GBP | Your chosen paypal currency |
| PP_SANDBOX | [true/false] | false | For developers - change this to 'true' if you want test out using the developer sandbox version of paypal |
| Email templates are all held in the folder main/ajax/html/emails/ - all default values include [../ajax/html/emails/] | |||
| ACTI_NO_HTML | activate_email_sans_html.php | welcome/activation email template | |
| FGPS_NO_HTML | forgot_password_sans_html.php | forgot password email template | |
| CONGRATS_NO_HTML | congrats_sans_html.php | your ‘congrats your account is active’ email template | |
| PASS_CHANGE_NO_HTML | password_sans_html.php | ‘your password has been changed’ email template | |
| EMAIL_CHANGE_NO_HTML | re_activate_email_sans_html.php | ‘your email address has been changed’ email template | |
site stats settings
| variable | values | default value | comments |
| TRACK_VISIT | [true/false] | true | Set to false if you do not want to track your users/visitors on your site via sitestats (if you do not want to use sitestats at all then you may want to download the standalone userbase user management system rather than the ‘nerve centre’ version). |
| TRACK_PAGEVIEW | [true/false] | true | If you want to track visits but not individual pageviews (to reduce data load) then set this to false but ‘TRACK_VISITS’ to true. |
user guide: userBase dashboard
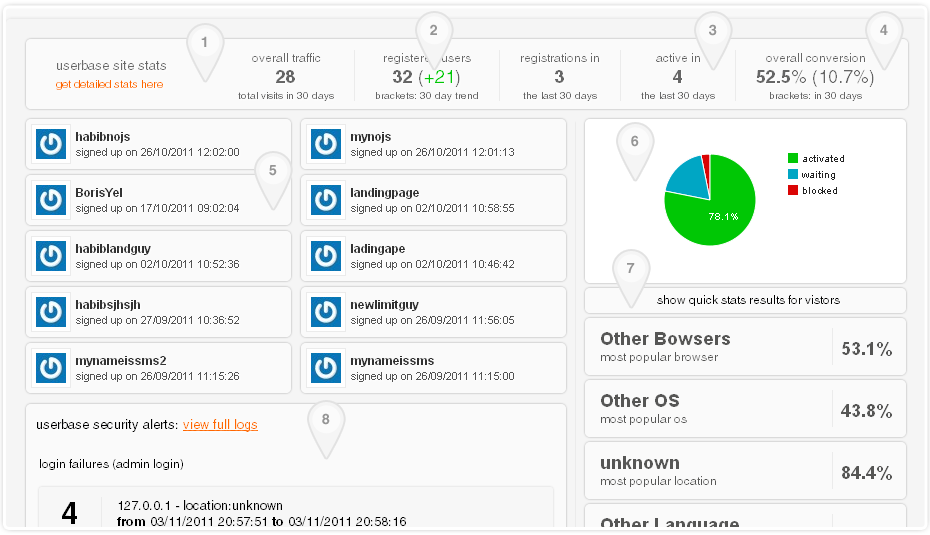
2 - The number of registered users in the last 30 days (not calendar month).
3 - This shows the 'movement' of registrations for the current 'last 30 days' compared with the pervious 'last 30 days'.
Oh, that so needs to be explained:
So if you have days 1-60 and during days 1-30 you had 40 registrations and during days 31-60 you had 30 registrations then this value will show -10 (indicating a negative trend in registrations).
4 - The number of users who have signed in at least once in during the last 30 days.
5 - Overall conversion – please note the visitor figure on the left hand side is for the last 30 days where as the bold conversion figure here is for all visitors since site stats was activated. Figure in the brackets shows the 30 day conversion.
6 - A list of the most recent users.
7 - User account status chart.
8 - Quick stats showing the most popular browser, os, country and language by visitor and registered user.
9 - Failed login alerts area.
user guide: userBase main user details
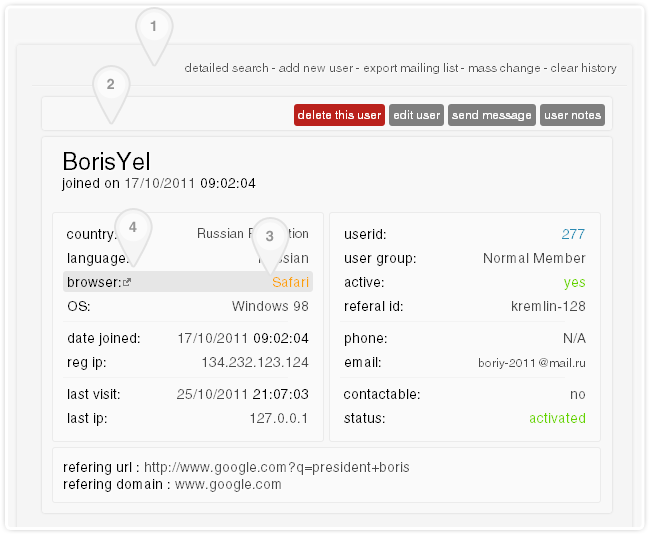
b. add new user account
c. export mailing list – will export all the users (username, emails and whether they are allowed to be contacted or not) in the current search list (not just the ones shown on the current page).
d. mass change - quickly change the account status of all users in the current results set. So if you find dodgy signups from a particular referring url or ip address – select all the users using ‘clickable search’ and then mass block the accounts.
e. clear history - this is will, well, clear the history!
2 - Buttons bar – options for each nested title – these will change depending on which title you are on.
3 - Clickable Search - all values are clickable searched enabled in the user details title except for the userid.
4 - The little release filter icon – whether you search via click or via the detailed search facility, this little icon will appear next to the area that is currently being filtered. Click on it here or in the detailed search area to release that filter while keeping all others intact (slowly widening your search).
All other areas are self explanatory.
user guide: userBase side bar functions
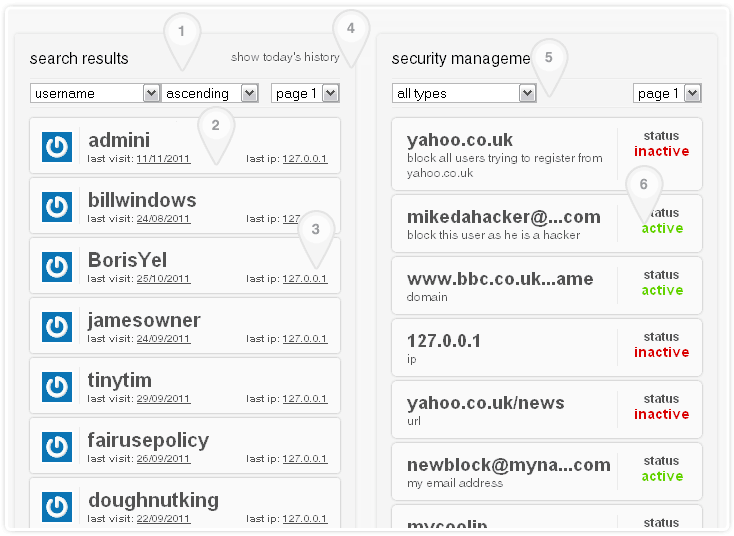
2 - One results 'bar'. Clicking on the bar will display the user record (this also applies to user groups & security blocks/elements).
Hover over it and you get a small bubble showing quick details (you can easily expand this to contain any relavant information for your own needs).
3 - Clickable search enabled data.
4 - Session user history.
5 - Security blockable types - IP / email / email domain / refering domain / refering URL. These can either apply to blocking registration, site access or both.
6 - Security blocks can easily be activated and de-activated without entering that particular record.
user guide: siteStats overview screen
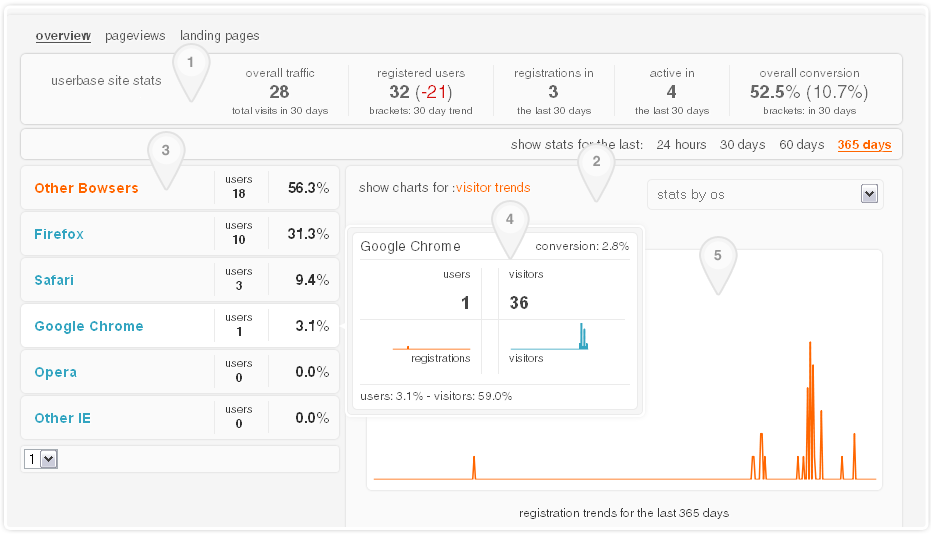
From left to right:
b. The number of registered users in the last 30 days (not calendar month).
c. This shows the 'movement' of registrations for the current 'last 30 days' compared with the pervious 'last 30 days'.
So if you have days 1-60 and during days 1-30 you had 40 registrations and during days 31-60 you had 30 registrations then this value will show -10 (indicating a negative trend in registrations).
d. The number of users who have signed in at least once in during the last 30 days.
e. Overall conversion – please note the visitor figure on the left hand side is for the last 30 days where as the bold conversion figure here is for all visitors since site stats was activated. Figure in the brackets shows the 30 day conversion.
2 - Overall graphical view of traffic flows (registrations & visits)
3 - Detail break down of various metrics. Each bar shows the name, the number of users and the percentage those users make of the overall total (this is not the conversion rate – that is shown in the bubble).
4 - Hover over any bar and you get a details bubble. This shows the conversion rates, absolute figures, charts and the % of users and visitors using any given metric.
Please keep in mind that all data outside the quick stats bar up top is restricted by the ‘show stats for the last…’ option.
Pageviews & landing page tiles show general information about each page. Clicking on an individual landing page entry will show a more detailed information just like the overview but restricted for that page.
Please note: At the time of writing this all graphs run off googles charts api. You will need internet connectivity for them to show up.
user guide: siteStats detailed stats screen
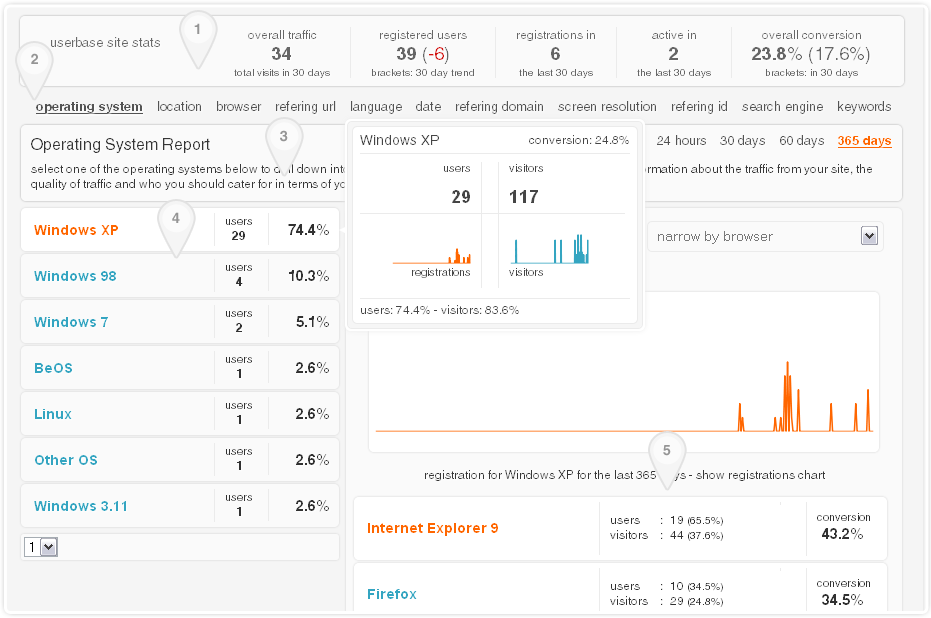
From left to right:
b. The number of registered users in the last 30 days (not calendar month).
c. This shows the 'movement' of registrations for the current 'last 30 days' compared with the pervious 'last 30 days'.
So if you have days 1-60 and during days 1-30 you had 40 registrations and during days 31-60 you had 30 registrations then this value will show -10 (indicating a negative trend in registrations).
d. The number of users who have signed in at least once in during the last 30 days.
e. Overall conversion – please note the visitor figure on the left hand side is for the last 30 days where as the bold conversion figure here is for all visitors since site stats was activated. Figure in the brackets shows the 30 day conversion.
2 - This is the current set of metrics that sitestats will collect and report on.
3 - Options bar - time/’days’ restriction applies locally to each report. For reports such as referring url, domain, referring id, date and search terms there is a search facility to allow you to find the exact data you are looking for.
4 - Hover over any bar and you get a details bubble. This shows the conversion rates, absolute figures, charts and the % of users and visitors using any given metric.
5 - Unlike the 'stats overview' tile these results allow you to drill down into each metric by clicking the results bars on the left. In the screen shown the user has drilled down in the Operating system report to show all browsers used for those using WindowsXP.
This allows you to see what traffic is coming to your site to easily see the ‘digital demographics’ of your visitors and registered users. This is more important when looking at referring (domain/id/url) reports or the search engine/search term reports
That's your lot. If you find any bugs or features you'd like to see in future editions then contact me asap
